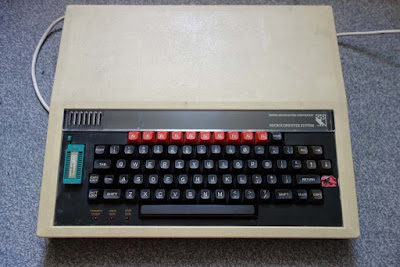
After some looking I found a suitable BBC Micro Model B, I duly purchased this for the princely sum of £50 plus shipping. After a short wait, it duly arrived but I didn’t power the machine up as the power supplies have a nasty habit of letting out the magic smoke. In the mean time I had sourced a suitable RGB to Scart cable and a PSU repair replacement capacitor kit. Both of these came from the excellent Retro Computer Shack.
My BBC Micro
Inside the BBC Micro, the previous owner had fitted a Watord Electronics Sideways ZIF Socket which allows you to change ROMs with the minimum effort.
Replacing the capacitors
WARNING!
Dangerous voltages reside inside the PSU, even when switched off and unplugged.
Ensure that all the high voltage caps are safely discharged first!
YOU SHOULD READ THE WARNING LABEL

 |
| Power supply removed from the Beeb |
Once the PSU had been wrangled out of its case, I set about replacing the 10nF (0.01µF) and 100nF (0.1µF) X class mains filter capacitors and a small 220µF electrolytic capacitor which sometimes causes intermittent power supply startup issues. The modern replacement mains filter capacitors are X2 class.
The RIFA branded capacitors are prone to failures, when the do fail they realise plumes of noxious smoke.
 |
| Power supply extracted from its case |
 |
| Existing RIFA capacitors, ticking time bombs |
 |
| New X2 mains filter capacitors fitted |
Here's a shot of the old RIFA capacitors showing those stress lines and hairline cracks that would eventually result in a failure.
With the capacitors replaced I re-assembled the power supply. I fitted it back into the BBC Micro and powered on, it passed the smoke test phew. Alas the BBC Micro would not start up, It just emitted a continuous tone and there was no display on the screen.
Repairing the poorly BBC Micro
The fault I was getting could be caused by a faulty video processor chip but as I didn’t have one to hand, I tried re-seating the chip and I also re-seated some of the other chips but this made no difference. Next step try checking the voltages, which were all correct but when I was probing the various +5V, -5V and 0V connectors on the main PCB, it suddenly sprang into life.
Hmm I thought it could be a dry joint so I removed the main PCB and checked for dry joints but couldn’t see any. There are several power supply connection points on the main PCB, which are FASTON PCB Tab type connectors. I re-flowed all of these connections on the back of the main PCB. Having done this, I re-assembled the machine and tried again. Success the machine started up correctly, I got the classic twin tone beep and was presented with the start screen prompt.
Finally I gave the case a good clean using hot soapy water to remove the years of ground in grime.
More repairs..
Having repaired my beeb, I thought I would try loading a game from cassette, well it would appear my beeb is deaf. I tried loading a couple of games from tape but it doesn't appear to acknowledge with Searching. I've also tried to save but the cassette LED doesn't come on and there's no acknowledgement with Record then return message.
I tried the following:
1. Just playing a tape which appears to make all the correct noises
2. Changing the cassette lead
3. Swapping IC35 (LM324 Op Amp)
4. Reseating IC7 (Serial 2C199E-7 ULA)
I have verified that the cassette motor LED and relay work by removing the serial ULA and connecting PIN 11 to +5v.
 |
| Op Amp and Serial ULA locations |
 |
| Faulty Serial ULA |
So I went off in search of a replacement serial ULA, I eventually managed to source one from a member of the Stardot forum, having fitted the replacement serial ULA my beeb now works correctly.
 |
| Success! |


